In this post I will tell you how to set up your own mail server using Postfix and Dovecot. Postfix functions as a Mail Delivery Agent (MDA), so any apps you have running on the server can send out emails, and Dovecot functions as a Mail Transfer Agent (MTA), which lets you hook up a Mail User Agent (MUA), such as Windows 10’s Mail app, or Thunderbird. Because I’m moving away from PHP, I did not experiment with webmail. There are no real popular Node.js webmail apps yet.
To set up your own mail server, you have to have a public facing server with a domain name, static IP, and Certificate Authority (CA) signed SSL certificate, there’s just no way around that. Mail programs balk at connecting with self-signed certs, and services like Gmail won’t even accept mail from dynamic IP addresses on servers hosted on home networks. You can still set one up on your home server to test a lot of things, and send mail between different users on the same server.
The real deal can be cheap, though. DigitalOcean offers servers (which they call Droplets) as cheap as $5/month (mine is $20/month), and Let’s Encrypt can hook you up with a signed wildcard SSL-cert for free. I will go over how to get your cert in a linked post, because it will be useful for all kinds of things.
Networking Setup
-
Obtaining your signed wildcard SSL certificate
-
Creating the necessary DNS entries
-
Configuring the firewall on your server
Application Setup
Troubleshooting
References
Networking Setup
Note, all my DNS examples are shown using DigitalOcean, but any hosting service should have a similar operation (e.g. GoDaddy.com).
Obtaining your signed wildcard SSL certificate
I go over that here.
If you are setting this up on a server hosted at home and just want a self-signed one to see if everything else works before you promote to production, I’ve got another post here that goes over that.
Creating the necessary DNS entries
I added this one early on because DNS records take a while to propagate through the world, so if you do this now, it will likely have taken effect everywhere by the time you’re done with this post.
If you have a domain name that points to your server, you’ll have A records already. I have two, one for jogerfy.com and one for *.jogerfy.com. This means that if a user goes to https://jogerfy.com/ or https://www.jogerfy.com/ they will get to the same server, and beyond that redirection is handled with Nginx. If you do not have these already, you create them like so from your DNS management panel (obviously substituting your own server’s IP for the one in these screenshots, which was made up).

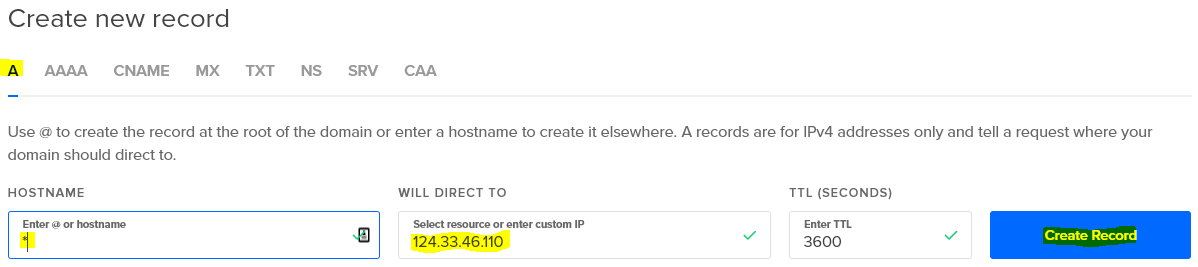
Note that for example.com, the HOSTNAME is @, and for *.example.com, the HOSTNAME is *.
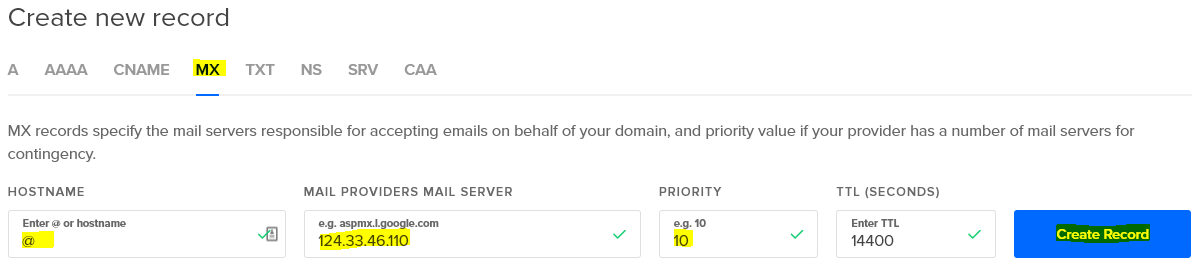
Once your A records are there, you’ll need to add at least two more DNS records, an MX record, and a TXT record. These tell other mail services like Gmail that you are a real mail service that can be reached by a reply,and not a spam factory running on a home network.
The MX record is entered as follows, again using an @ for the HOSTNAME.
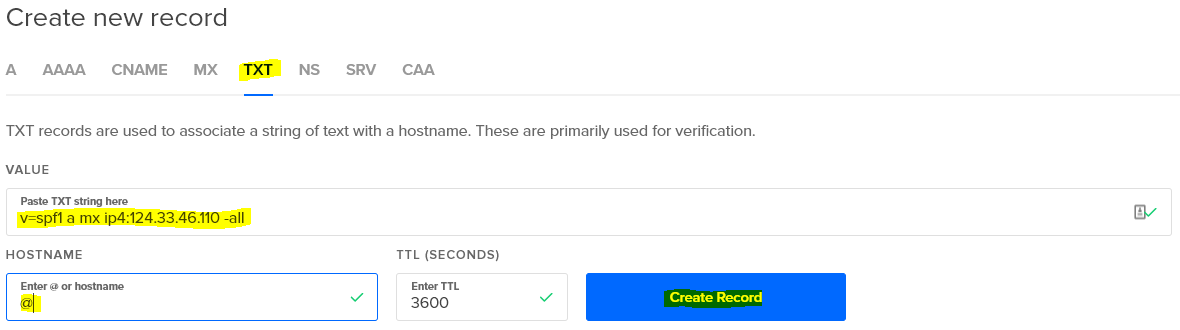
The TXT record is a special one called a Sender Policy Framework (SPF) record, and it is technically optional, but Gmail will not accept mail unless you have one. The exact wording may vary, but this one is a good generic setting.
There you go. In a couple hours at most, Gmail will know you’re legit. It will still route any mail sent to a user to their Spam folder at this point, until they email you back once, and from then onward messages sent to that user will go into their Inbox. Most other services are not so cautious and will pass along mail straight to the Inbox after seeing the MX and TXT records.
Configuring the firewall on your server
I’m a big believer in security, so though I don’t understand a lot, I do know that we don’t want open ports that we’re not using. If you have a an SSH server and a web server running, you most likely have open only ports 22, 80, and 443. SSH uses port 22. Web servers use ports 80 and 443 (HTTP defaults to port 80, and HTTPS defaults to port 443). For mail, you’ll need to open ports 25, 143, 465, and 587. Incoming mail is relayed on port 25, mail software like Windows 10’s Mail app uses ports 143 for incoming mail, and usually 587 for outgoing, and submission of mail by apps, such as a Node.js app you may have running, likes to send on port 465. By setting up your own server, you can create as many accounts as you want and avoid sending through your personal Gmail account. Here’s how you open those ports.
You should have iptables (and it’s IPv6 equivalent, ip6tables) installed, whether you’re using Ubuntu or CentOS. You’ll need another tool that isn’t usually installed called iptables-persistent in order to save your settings.
sudo apt-get install iptables-persistent
A lot of people now are using an extra administration tool called Uncomplicated Firewall (UFW). To see if you have it installed, do
which ufw
If you don’t see it, you can do
sudo apt-get ufw
sudo ufw enable
Then you can simply open the ports like so
sudo ufw allow 22
sudo ufw allow 143
sudo ufw allow 465
sudo ufw allow 587
I don’t use UFW. As I said above, I don’t understand security very well, and although UFW is supposed to be Uncomplicated Firewall, it seems to add a lot of entries to the iptables that I don’t understand and therefore won’t put my money on. If you do all these UFW steps above and type
sudo iptables -S
you’ll see what I mean. Therefore, I just use iptables manually. I type
sudo iptables -S
It should start with three -P entries and then have at least 3 -A entries, one of them being port 22.
-A INPUT -i lo -j ACCEPT
-A INPUT -m conntrack --ctstate RELATED,ESTABLISHED -j ACCEPT
-A INPUT -p tcp -m tcp --dport 22 -j ACCEPT
These are Allow entries. The port 22 one allows you to connect via SSH. Make sure you don’t delete this one. To add more entries, you’d type:
sudo iptables -I INPUT 4 -p tcp --dport 25 -j ACCEPT
sudo iptables -I INPUT 5 -p tcp --dport 143 -j ACCEPT
sudo iptables -I INPUT 6 -p tcp --dport 465 -j ACCEPT
sudo iptables -I INPUT 7 -p tcp --dport 587 -j ACCEPT
sudo ip6tables -I INPUT 4 -p tcp --dport 25 -j ACCEPT
sudo ip6tables -I INPUT 5 -p tcp --dport 143 -j ACCEPT
sudo ip6tables -I INPUT 6 -p tcp --dport 465 -j ACCEPT
sudo ip6tables -I INPUT 7 -p tcp --dport 587 -j ACCEPT
The number after the INPUT argument tells where in the order of Allow entries it should be added. So if you have a lot of Allow entries, such as for port 80 and port 443 and maybe 1521 (Oracle) and 5432 (PostgreSQL), you may want to place them further down the list, and you’d raise that number appropriately. You can do
sudo iptables -S
To check your work. Once you are satisfied, save the settings with
sudo service netfilter-persistent save
If you don’t use this command, once you reboot, none of your changes are saved, which is actually handy if you screw something up. If you just added an entry twice or added it in the wrong order and wish to delete it, you can do
sudo iptables -D INPUT -p tcp -m tcp --dport 143 -j ACCEPT
And obviously substitute the port you want to delete for the 143. Don’t forget to run the same command with ip6tables if you want to delete it there as well. Save your settings with netfilter-persistent save.
Application Setup
Mailutils
This is a set of tools for sending and reading mail from the command line. You can use it to test to see if your Postfix installation and mailboxes are set up correctly. Linux has a built-in mail command. So, why Mailutils? The built-in mail command only reads form /var/mail/$USER, and we would like to keep our mail in /home/$USER/Maildir so that it is more compatible with our endpoint app, like Window 10’s Mail app, or Thunderbird, which use a folder structure, rather than keeping all mail in a single file. Let’s configure this.
sudo apt-get install mailutils
Thence, create the file…
sudo nano /etc/mailutils.conf
And fill it with…
mailbox {
  # Create mailbox url using pattern.
  mailbox-pattern "maildir:///home/${user}/Maildir";
}
You will also need to change PAM so when you log in it will look in this new location.
sudo nano /etc/pam.d/sshd
Change
session optional pam_mail.so standard noenv # [1]
to:
session optional pam_mail.so dir=~/Maildir standard noenv # [1]
Postfix
This is the majority of the mail server, and it requires the most configuration. Start by installing it.
sudo apt-get install postfix
Whether or not it is already installed, you’ll need to run its configuration tool.
sudo dpkg-reconfigure postfix
General type of mail configuration: Internet Site
System mail name: example.com
Root and postmaster mail recipient: john.doe
Other Destinations to accept mail for (blank for none): $myhostname, $myhostname.$mydomain, $mydomain, localhost, localhost.localdomain
Force synchronous update on mail queue?: <No>
Local networks: 127.0.0.0/8 [::ffff:127.0.0.0]/104 [::1]/128
Use procmail for local delivery? <No>
Mailbox size limit (bytes): 0
Local address extension character: +
Internet protocols to use: all
john.doe is the administrator of this machine. You should substitute your main account for this username.
There is a lot more configuration to come. No worries, if you want to have a basic level of security, paste in the following, substituting your own domain for example.com. If you haven’t set up a real wildcard CA-signed cert as I wrote about earlier, make sure your smptd_tls_cert_file and smtpd_tls_key_file point to the appropriate files. You would also omit the smtpd_tls_CAfile line since self-signed SSL certificates do not have a Certificate Authority (CA).
sudo postconf -e 'mydomain = example.com'
sudo postconf -e 'home_mailbox = Maildir/'
sudo postconf -e 'smtpd_sasl_type = dovecot'
sudo postconf -e 'smtpd_sasl_path = private/auth'
sudo postconf -e 'smtpd_sasl_local_domain ='
sudo postconf -e 'smtpd_sasl_security_options = noanonymous'
sudo postconf -e 'broken_sasl_auth_clients = yes'
sudo postconf -e 'smtpd_sasl_auth_enable = yes'
sudo postconf -e 'smtpd_recipient_restrictions = permit_sasl_authenticated,permit_mynetworks,reject_unauth_destination'
sudo postconf -e 'smtp_tls_security_level = may'
sudo postconf -e 'smtpd_tls_security_level = may'
sudo postconf -e 'smtpd_tls_protocols = !SSLv2, !SSLv3'
sudo postconf -e 'smtp_tls_note_starttls_offer = yes'
sudo postconf -e 'smtpd_tls_cert_file = /etc/letsencrypt/live/example.com/cert.pem'
sudo postconf -e 'smtpd_tls_key_file = /etc/letsencrypt/live/example.com/privkey.pem'
sudo postconf -e 'smtpd_tls_CAfile = /etc/letsencrypt/live/example.com/fullchain.pem'
sudo postconf -e 'smtpd_tls_loglevel = 1'
sudo postconf -e 'smtpd_tls_received_header = yes'
I won’t go over all of this, but the smtpd_tls_protocols says that we will only be accepting TLS connections, which are currently the most secure, home_mailbox sets us up to use the same Maildir directory that we configured for Mailutils earlier, which is more modern than keeping all users in a central /var/mail/$USER file, and smtpd_sasl_type sets us up to use Dovecot, which I’ll be going over in the next section.
sudo nano master.cf
Uncomment the following lines (delete the prefixing #)
submission inet n       -       y       -       -       smtpd
  -o syslog_name=postfix/submission
  -o smtpd_tls_security_level=encrypt
  -o smtpd_sasl_auth_enable=yes
  -o smtpd_tls_auth_only=yes
And
smtps     inet  n       -       y       -       -       smtpd
  -o syslog_name=postfix/smtps
  -o smtpd_tls_wrappermode=yes
  -o smtpd_sasl_auth_enable=yes
This enables both the SMTPS and submission services, which are used to sent mail via an MUA app (mail app) and submit mail on behalf of other apps (e.g. Node.js apps).
Let’s add a few aliases to /etc/aliases because root cannot receive mail by default on modern systems
sudo nano /etc/aliases
Replace its content with the following
mailer-daemon: postmaster
postmaster: root
nobody: root
hostmaster: root
usenet: root
news: root
webmaster: root
www: root
ftp: root
abuse: root
root: john.doe
Replace john.doe with the user doing this configuration.
Restart Postfix to activate the changes with the following command
sudo systemctl restart postfix.service
You are ready to test it with Mailutils to see if mail gets delivered. Send some to yourself. If your username is john.doe, try
echo "mail body"| mail -r "john.doe@example.com" -s "test mail" john.doe
mail
You can also try sending mail to other users on the same machine, with the exception of root, who will not receive it, for security purposes.
If it arrived, you’ll see it listed in the mail command line utility. You can read it by typing its number and then enter, e.g. 1, and then delete it with d1 and then exit with q. You also should now have a directory called Maildir under /home/john.doe. We changed it from /var/mail/john.doe because Dovecot defaults to this newer convention.
Dovecot
The final step. Install it and a couple of necessary accessories with the following command
sudo apt-get install dovecot dovecot-imapd dovecot-pop3d
Now edit three configuration files for it
sudo nano /etc/dovecot/conf.d/10-master.conf
Find the section Postfix smtp-auth and uncomment and change it as follows
# Postfix smtp-auth
unix_listener /var/spool/postfix/private/auth {
  mode = 0660
  user = postfix
  group = postfix
}
sudo nano /etc/dovecot/conf.d/10-mail.conf
Change the mail_location to match that which we set up for Mailutils earlier
mail_location = mbox:~/mail:INBOX=/var/mail/%u
becomes
mail_location = maildir:~/Maildir:LAYOUT=fs
sudo nano /etc/dovecot/conf.d/10-auth.conf
Change the auth_mechanisms to add the login option (basic encryption)
auth_mechanisms = plain
becomes
auth_mechanisms = plain login
And finally update Dovecot’s certificates and the protocols it will support
sudo nano /etc/dovecot/conf.d/10-ssl.conf
Change the lines
ssl_cert = </etc/dovecot/private/dovecot.pem
ssl_key = </etc/dovecot/private/dovecot.key
to
ssl_cert = </etc/letsencrypt/live/jogerfy.com/fullchain.pem
ssl_key = </etc/letsencrypt/live/jogerfy.com/privkey.pem
and the line
ssl_protocols = !SSLv3
to
ssl_protocols = !SSLv2, !SSLv3
Now restart Dovecot
sudo systemctl restart dovecot
Now you can hook up modern mail apps to it, such as Windows 10’s Mail. Try this.
Settings->Manage accounts->Add an account->Advanced setup->Internet email
Enter your settings like so
Email address: john.doe@example.com
User name: john.doe
Password: <john.doe's Linux account password>
Account name: john.doe@example.com
Send your messages using this name: John Doe
Incoming mail server: imap.example.com
Account type: IMAP4
Outgoing (SMTP) email server: smtp.example.com
☑ Outgoing server requires authentication
☑ Use the same user name and password for sending mail
☑ Require SSL for incoming email
☑ Require SSL for outgoing mail
Note that imap.example.com and smtp.example.com are the same server. In the earlier section on setting up DNS records I mentioned that we added an A record that pointed *.example.com to a single IP address. If you did not do this, please point it to the actual server name. If you are using a self-signed SSL certificate, this will still work, but you will have to click through some warnings in Mail, and you’ll have to have your mail servers referenced in your machine’s host file. If you’re using Linux, add them to /etc/hosts, and if you’re using Windows, add them to C:\Windows\SYSTEM32\drivers\etc\hosts
.
You’ll have to give yourself permission to edit the file under Windows first, then add an entry like this, substituting the machine’s IP on your local home network.
192.168.0.128 imap.example.lcl smtp.example.lcl
If everything is set up correctly on a public facing server with DNS records, you should be able to email from the account to outside addresses, receive email. And even on a home server you should at least be able to email other users on the same server, and see the messages both from Mail and the command line mail utility, and see deleted messages disappearing in both. If not, read on to the next section.
Troubleshooting
I must have hit every branch on the tree on the way down to getting this working, and without the following tools, I never would have been able to figure out what I was doing wrong:
log files
This is the first and most important tool. It told me Gmail was rejecting my mails and how to fix that.
sudo tail /var/log/mail.err
sudo tail /var/log/mail.log
nmap
This can tell you whether your ports are open in the firewall, and if they’re available but “closed,” they likely are missing a backend service. I found out I didn’t have the dovecot-imapd and dovecot-pop3d packages installed this way because I had port 465 and 587 open in iptables but closed in nmap.
nmap localhost
sslscan
This can tell you what ciphers your server accepts on a specific port. SSLv3 ciphers on down are no longer considered secure enough, so you should only be seeing TLS ciphers.
sslscan localhost:465
dig
This can be run from a faraway server to see if MX or other types of records have propagated yet.
dig MX example.com +short
Should return the DNS entry to route mail to a particular server.
openssl
The most complex command here, openssl will tell you if something is running on a port at all, if it has auth_mechanisms of plain or login or anything else, and if a user can be authenticated on a particular port using a username and password. One example is
openssl s_client -crlf -connect localhost:465
Then type in
EHLO localhost
And you should see, among other things
250-AUTH PLAIN LOGIN
250-AUTH=PLAIN LOGIN
If you don’t, there is a problem upstream. Type QUIT to exit.
References
Networking Setup
- https://mediatemple.net/community/products/dv/204404314/how-can-i-create-an-spf-record-for-my-domain
- https://www.kitterman.com/spf/validate.html
Application Setup
- https://help.ubuntu.com/lts/serverguide/postfix.html.en
- https://help.ubuntu.com/community/PostfixBasicSetupHowto
- https://www.tecmint.com/install-postfix-mail-server-with-webmail-in-debian/
- https://www.digitalocean.com/community/tutorials/how-to-set-up-a-postfix-e-mail-server-with-dovecot
- https://mailutils.org/manual/html_node/mailbox-statement.html
Troubleshooting
- https://superuser.com/questions/1119892/no-mail-message-after-logging-into-vps-even-though-i-uninstalled-mailutils-a/1119920
- https://talk.plesk.com/threads/solved-postfix-mail-for-domain-com-loops-back-to-myself.329459/
- https://superuser.com/questions/109213/how-do-i-list-the-ssl-tls-cipher-suites-a-particular-website-offers
- https://serverfault.com/questions/670348/how-to-force-a-own-set-of-ciphers-in-postfix-2-11
- https://wiki.zimbra.com/wiki/Simple_Troubleshooting_For_SMTP_Via_Telnet_And_Openssl
- https://www.saotn.org/test-smtp-authentication-starttls/
- https://github.com/nodemailer/nodemailer/issues/165